
If you've been sewing for any length of time and find that sometimes your domestic machine just can't do it, you may be tempted by the siren song of the industrial sewing machine.
I learned on an industrial and so they are familiar beasts to me, I don't think I could live without one! But I often read on online forums about people who have taken the jump, only to get their new machine and....it is terrifying. I'd like to give you a few bits of advice that will help to decide if an industrial is right for you, and some helpful beginning tips if you've already got one and are having problems.
First off, do you need an industrial? If you are planning on sewing heavy fabrics or leather, yes. A basic straight stitch machine will do almost everything you need, and once you've experienced a knee lift you are going to love being able to sew with both hands. You can get industrials that will do a zig zag stitch, although that would be much more specialized.
Flat bed industrials come with either standard feet or walking feet. Walking feet are helpful if there are thick spots in your work.
If you are in the market for an industrial but the $1200-$4000 price tag has you concerned, I highly recommend Sailrite. They have some pretty boss "portable" industrials that can be put into a table later on if you wish. They also have great tutorials, and seem to be clean, polite folks for a bunch of seafaring hippies. Anyway, let's get down to it!
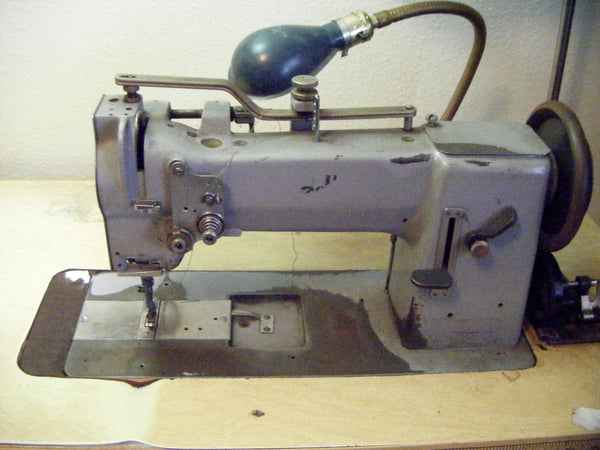
Not very inspiring, is it?
This is my Adler 067 industrial machine on the day I got it. Nicknamed Irene, this machine came from an upholstery shop. Irene is not stock. She's had some changes made, which means she takes parts that normally she wouldn't. This is handy to know if you are looking at a used machine.
I opted for a machine with a top loading bobbin, this is an important consideration based on what type of sewing you do. Both bobbin styles have merit, but a top loader is easiest for me. If you do very large items, an undermount bobbin may be a good choice if you don't want to have to move all of your work.

So here is Irene today. You'll notice I added some paint, because it's fun, and I've also swapped out the old incandescent light assembly. The old lamp lit the backside of the machine and also was in bad enough shape that the shade would become detached. It also put out an inhumane amount of heat. Having large pieces of canvas bunch up behind the machine and possibly touch that light made me afraid of having a conflagration.
There are a lot of lamp choices out there. This is an Uberlight 8000C LED gooseneck. I went with this one for several reasons.
A. The gooseneck is long enough to light the front of my workstation.
B. It isn't hot, even after hours of use.
C. It has a clamping base, but also has holes if you want to bolt it to your table. You can mount it just about anywhere.
D. It is very affordable, I think I paid around $60 for this guy a few years ago.
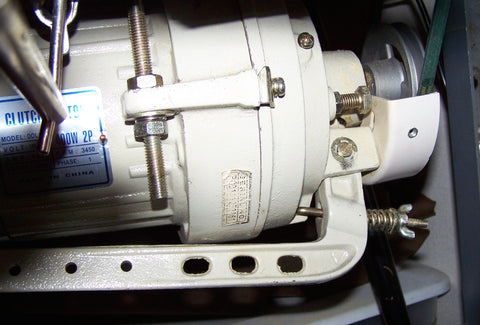
Here is my clutch motor. If you looking at a new machine you may have a choice between a clutch and a servo. Servo motors are nice in that they are virtually silent, don't put out heat, and you can set the top speed to avoid messy takeoffs. I am going to talk about clutch motors, since they seem to be the biggest issue folks have with industrial machines.
SPEED
The complaint I see the most is "The machine goes too fast! How can I slow it down?!"
The answer I see most often, is "Get a servo" or "Add a pulley and an extra belt". While both of these work, they're really much more work than a decent person should have to do.
Look at the photo again, see that wing nut in the lower right hand corner? That's it. That wing nut controls your speed. Run a few simple tests and you'll have your new baby dialed in in no time.
First off, set your pedal. All of those holes in the arm coming off of the bottom of the motor are for your pedal bar. You can adjust how far down you need to push to go from stop to full speed ahead. For example, I have my pedal set at the steepest angle for full stop, and I would have to stand on my toes to go full speed. I have the pedal bar set through the hole furthest from the nut, this gives me much more control. All of the speeds between stop and WHOA are easy to find with the full sweep of the pedal in use. The closer the hole is to the nut, the less play you have. So choose the hole you think is right for your style, and make sure to tighten the adjustment in the pedal bar itself.
Next up, time to play with your nut. First, run a test piece of fabric through the machine. Keep your hands clear and just see how fast she goes. To adjust the speed, turn the nut about halfway clockwise. Run your fabric again. This will give you an idea of how much that half turn changes things. So, you can speed up or slow down just by turning the nut either towards you or away. You may have to play with it for some time to get it feeling right, but it is simple to do. If you get more comfortable with your machine later on, you can always ramp it up!
CLUTCH
The clutch is a safety mechanism for your machine. If you get a nasty thread jam or have some other issue, you will pop your clutch. You'll know it has happened if you cannot pick up your bobbin thread.
FIRST: Check your machine to make sure that you haven't got a wad of thread under the plate or had a needle divert and strike your hook. If everything looks alright and is moving smoothly, you'll need to reset your clutch.
BUTTON: Some machines have a button on the bed, it's usually located near the body of the machine, right hand side, inside the throat. Simply press that button while turning the hand wheel forward (or back) until you hear a thunk. Your clutch has been reset.
IF YOU DON'T HAVE THIS BUTTON: Open your bobbin case and grab the hook, careful not to let the end cut your fingers, hold it tight while turning the wheel backwards until you hear the thunk. Your clutch is now reset.
Lastly, and maybe this should have been first, read the manual. Make sure you are oiling your machine in all the right spots and know how to thread it. Take good care of it and it will take good care of you.
I will be adding more blogs on machines and hopefully will have some videos to help guide you in the future. Please let me know your questions!
Before you go, make sure to visit our new section full of fabric, notions and other crafting supplies: https://hbarncraftworks.com/collections/fabric-craft-supplies