
Most people are very familiar with Giardiniera from the brightly colored jars available next to the pickles in their supermarket. While I can't blame anyone for wanting the simplicity of readymade foods, fermenting your own at home is not only healthier, but a world different in terms of taste.
Fermentation lends a natural pickle flavor without the vinegar. Now that I've been eating fermented foods for a while, I find most vinegar based pickles taste of vinegar and very little else! This ferment also can be as spicy or tame as you like, based on your ingredients. This recipe doesn't include hot peppers, but you can certainly add some.
Giardiniera is a great way to keep summer alive well into winter. Serve alone as a relish, or top a salad of simple greens with it, no dressing needed.
Basic Peppery Italian Giardiniera Ferment:
EQUIPMENT:
3 quart jars with lids, washed and dried. Weights to fit the mouth of your jars, I use Japanese teacups for wide mouth jars or shot glasses for standard mouth jars.
2 large bowls, 1 medium sized bowl, colander
I recommend using gloves for the final assembly.
INGREDIENTS:
1/2 head cauliflower with stem and leaves, slice 1/4-1/2 inch thick. Smaller florets will fall of as you go. Matchstick the stem portions and slice leaves crossways into roughly 2 inch squares.
5 large red radishes, sliced into matchsticks. The radish greens from a full bunch, roughly chopped.
1 large carrot or two small ones, sliced into 1/4 inch thick discs, you can leave them whole or chop in half.
8 brussels sprouts, cleaned and quartered.
3 scallions, chopped into 1 inch pieces
1/2 small red onion, sliced thin.
1 large sweet bell pepper, sliced thin.
3 TBS minced garlic
1/2 cup loosely packed fresh basil leaves, whole
1 TBS loosely packed fresh mint leaves, whole
1 TSP whole peppercorns
2 TSP whole pickling spice
1 TBS Worcestershire Sauce (optional for vegan friendly)
10 cups distilled or filtered chlorine free water
1 cup 3 TBS sea salt or pickling salt (do not use salt with anti-caking agents)
STEP 1:
In one large bowl, dissolve 1/2 cup salt in 5 cups water
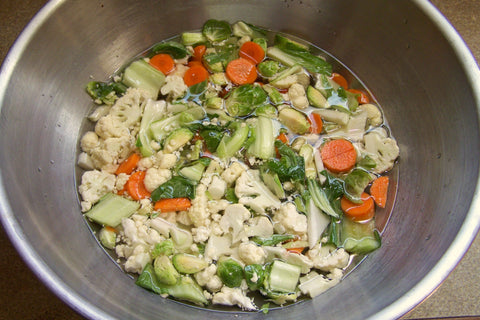
In your second large bowl, lay in all the cauliflower pieces, carrots and brussels sprouts. Sprinkle a 1/2 cup of salt over the veggies. Using your hands, turn and massage the veggies with the salt. This should take about a minute. Then transfer them into the salted water, mixing them in. You will probably have some loose salt left in the bottom of your mixing bowl, discard. Rinse that bowl and use to weight down the veggies in the other bowl. Let them soak while you chop the remaining vegetables.
STEP 2:
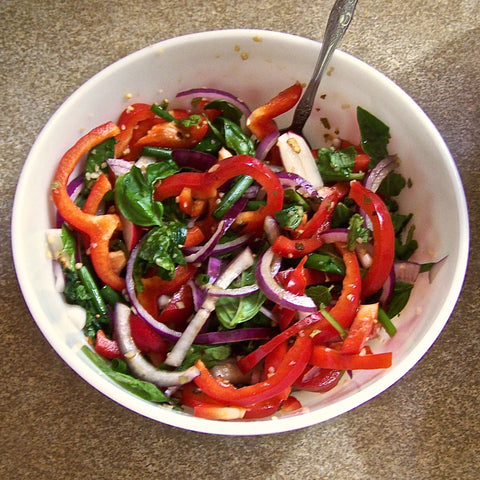
Add all other veggies and seasonings into your medium size bowl (excepting salt and water) and mix well to let the flavors marry.
STEP 3:
Put the cauliflower mixture into a colander and rinse thoroughly. Allow to drain well. Press lightly to help get most of the water out.
STEP 4:
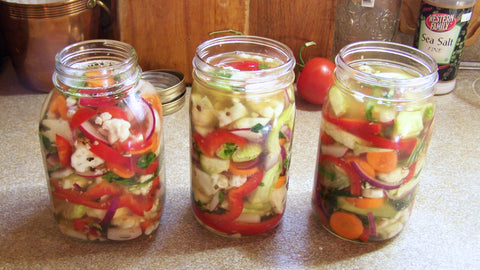
Put on your gloves and have your jars ready. Rinse one of your large bowls, mix the cauliflower mixture with the other vegetables with your hands. Pack into jars, pressing lightly to get rid of air bubbles. Your jars should be filled to about 1 inch below the rim.
When jars are filled, use 1/2 cup of water to rinse your mixing bowls and divide evenly between the 3 jars to make sure you get all of the good bits!
Mix 3 TBS salt with 4 cups water, fill the jars so that the liquid is covering all of the vegetables. Place your weights in the jars, making sure the vegetables do not break the surface.
STEP 5:
Place your jars in a baking pan to allow for spills as fermentation takes place. Your jars need to sit out of direct sunlight at room temperature for 4-7 days. Check the jars daily. Bubbles are a sign that fermentation is taking place. If you see any mold begin to form on the top of the liquid, simply scoop it out. Start tasting around day 4. If you want the mixture more sour, allow it to ferment another day, then taste again. You can cover your jars with a piece of cheesecloth or muslin secured with a rubber band to keep pests out if needed, but they need to be able to breath.
Once your ferment is to your satisfaction, clean the outside and rims of the jars to remove any gunk from overflows. Put the lids on and place them in your refrigerator. I usually wait a few days to start eating fermented foods. You can keep fermented veggies up to a year in cold storage, if you think you can stop yourself from eating the whole batch in a matter of days.
Just a reminder, fermented foods have a "funky" scent. When you open your jar you may think something has gone wrong, this is normal.